How to Upload Sd Card Files to New Macbook
How to migrate your EmuNAND to a new SD card#
File based EmuNAND#
Moving to a new SD card is like shooting fish in a barrel if yous have a file based EmuNAND.
Temper
Simply copy the contents of your onetime SD bill of fare to your new SD bill of fare.
SXOS
Simply copy the contents of your sometime SD carte du jour to your new SD card.
Sectionalization based EmuNAND#
You lot may employ one of the following methods to drift your EmuNAND to a new SD card:
- NxNandManager
- Hekate (temper simply)
- EmuTool
NxNandManager#
Make sure your new SD card is in FAT32 format. If yous don't know how to format your SD bill of fare to FAT32 then you may cheque this guide.
What yous'll demand:
- NxNandManager
Steps:
- Plug your SD menu into your PC.
- Create a new folder named
SD Backupon your Desktop. - Move all your files/folders from your SD card to your
SD Fill-infolder. - Extract
NxNandManager_vx.x.x_x64.aughtto your Desktop. - Run
NxNandManager_x64.exe. - Click on the
Filetab and selectOpen Drive. - Select your SD card.
- Click on
Full Dump. - Select the location for your emuNAND dump.
- In one case the emuNAND dumping procedure is done, plug your new SD card into your PC.
- Click on the
Filetab and selectOpen file. - Select your emuNAND dump.
- Click on the
Optionstab. - Select
Emunand Creation Tool (RAWNAND, Total NAND). - Make sure that the
SD Partitionoption is selected. - Select your SD card in the
Select target disk:surface area, and pressCreate emuNAND. - Confirm the restoration process.
- In one case done, close NXNandManager and move your files from your
SD Fill-infolder, to your new SD card.- Important:
If y'all get asked to merge folders, click aye. Simply if y'all get asked to overwrite files, press no.
- Important:
- Once done, access the
/emummc/folder on your SD card.- If there is a binder named
/ER00/, and 1 named/RAW1/, and then move the contents of the/RAW1/folder into the/ER00/binder and so delete the/RAW1/folder. - If the
/ER00/folder doesnt exist, and only the/RAW1/folder exists, so skip this step.
- If there is a binder named
- Once done, plug your new SD card back into your Switch.
- You may now boot into EmuNAND.
Hekate#
What yous'll need:
- Hekate
Steps:
- You'll accept to first boot into Hekate, and and so become to the
Toolstab. - Afterwards that choose
Backup eMMCand so turn onSD emuMMC RAW Partition. - Pick
SD emuMMC RAW GPP. - Once done, printing
Close, and go back to theToolstab. - Pick
Backup eMMCand so, and and so turn onSD emuMMC RAW Partitioning. - Pick
SD emuMMC BOOT0 & BOOT1. - Once the backup is done, plug your SD carte into your PC and go to your
/backup/xxxxxxxx/folder and movement allrawnand.bin.xx,BOOT0, andBOOT1files into therestorefolder. - Afterwards move your
backup,emummc, andbootloaderfolders onto your PC. - Move the
bootloaderfolder into your new SD bill of fare and plug it into your Switch.- If you are using a Mariko device, brand sure to transfer the
payload.binfile into the new SD card. - If you lot are using SX Gear, move the
boot.datfile also.
- If you are using a Mariko device, brand sure to transfer the
- Boot into Hekate and pick the
Toolstab. - Pick
Sectionalization SD Card. - Motion the
emuMMC (RAW)slider to29 FULL - Press
Next Stepand pressCommencement. - Once washed, plug your new SD card into your pc and move your
backupandemummcfolders into the new SD card.- If you are using a Mariko device, make sure to transfer the
payload.binfile into the new SD bill of fare. - If you are using SX Gear, move the
boot.datfile as well.
- If you are using a Mariko device, make sure to transfer the
- Plug your new SD carte into your Switch and boot into Hekate.
- Option
Restore eMMCand turn onSD emuMMC Raw Segmentation. - Printing
SD emuMMC RAW GPP. - Once done, printing
Close, and and so go back to theToolstab. - Pick
Restore eMMCand plow onSD emuMMC Raw Partition. - Pick
SD emuMMC BOOT0 & BOOT1. - Once done, press
Close, so pickemuMMC, and so pickDrift emuMMC, and finally pickFix RAW. - Once the operation is washed, you lot may motion the residual of your CFW files onto your new SD carte du jour and boot into atmosphere.
EmuTool#
First you volition have to download EmuTool and extract information technology to your desktop.
Once y'all've extracted the executable, correct click on EmuTool_vx.x.10.exe and click on run equally an administrator.
You will become a window that looks similar this:
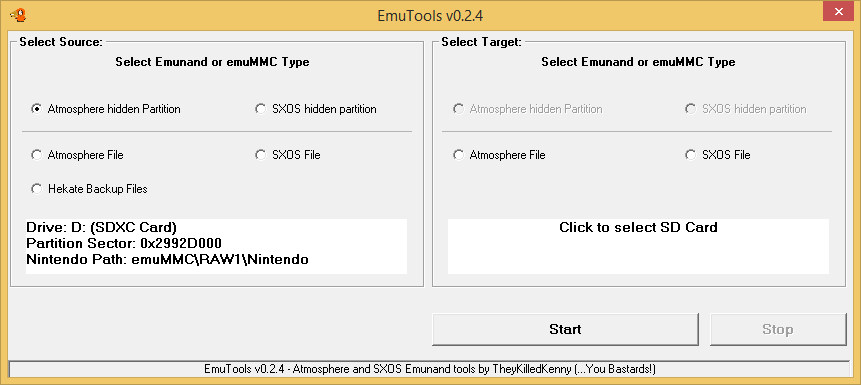
Now, In the source section you will take to choice what kind of emuMMC type y'all have.
If your Emunand was made on SXOS then option "SXOS hidden partition".
If your Emunand was made on Atmosphere then pick "Atmosphere hidden Partition".
Now click on "Click to select SD Card" and select your source SD card.
Make sure to pick the proper SD card, then hit ok.
In the target department yous will have to pick what kind of cfw you're planning on moving to.
If you want to stay on Atmosphere, option "Temper hidden Partition".
If you were on SXOS and want to move to Atmosphere, pick "Atmosphere subconscious partition".
If you were on atmosphere and want to move to SXOS, pick "SXOS hidden partition".
If you want to stay on SXOS, selection "SXOS hidden partition."
At present click on "Click to select SD Card" and select your target SD card.
Again, brand certain to selection the proper SD carte, then hitting ok.
Click on Start.
It's going to take some fourth dimension, and so look for information technology to finish.
In one case done, y'all'll be able to utilize your new SD carte du jour.
⬅️ Become Dorsum 🦝#
Source: https://rentry.org/EmuNANDNewSDcard
0 Response to "How to Upload Sd Card Files to New Macbook"
Post a Comment